AFFILIATE DISCLOSURE
This post may contain affiliate links. An affiliate means Escribr may earn referral fees if you make a purchase through our link without any extra cost to you. It helps to keep this blog afloat. Thanks for your support!
Did you know that by visiting this blog, you are doing good in the world? READ THIS.
Converting speech to text is essential for many industries, from call centers to classrooms. Whether you need to transcribe customer conversations or turn lecture recordings into notes, Amazon Transcribe offers a powerful and flexible solution to meet your needs.
In this post, we’ll walk you through how to use Amazon Transcribe to efficiently convert audio and video files into text.
What is Amazon Transcribe?

Amazon Transcribe is a service that automatically converts speech into text, making it easier to process and analyze large amounts of spoken content.
It supports real-time transcription as well as transcription from pre-recorded files, and it works with both audio and video inputs.
This versatility makes it a valuable tool for businesses, educators, and individuals who need accurate transcriptions quickly.
Why Use Amazon Transcribe?
There are countless reasons to use a speech-to-text converter like Amazon Transcribe.


Here are just a few examples:
- Call Centers – Automatically transcribe customer interactions for quality control, training, and compliance purposes.
- Education – Convert lectures into written notes for students, allowing them to review and study the material later.
- Content Creation – Quickly turn video or audio content into blog posts, social media updates, or other written formats.
- Legal and Medical Fields – Accurately document spoken information, whether it’s in client consultations, court hearings, or medical reports.
Getting Started with Amazon Transcribe
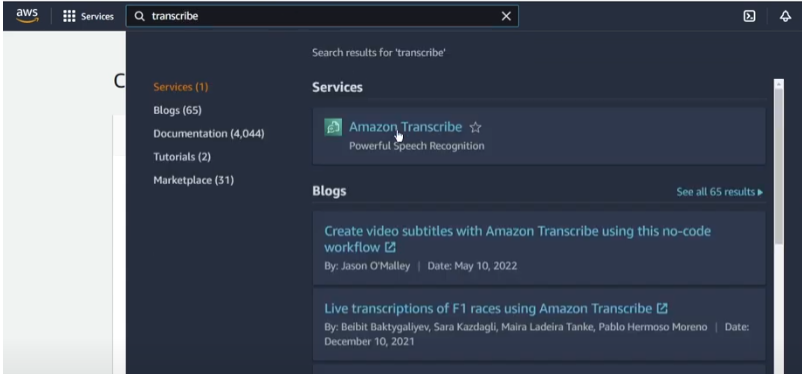
To begin using Amazon Transcribe, navigate to the Amazon Web Services (AWS) console.
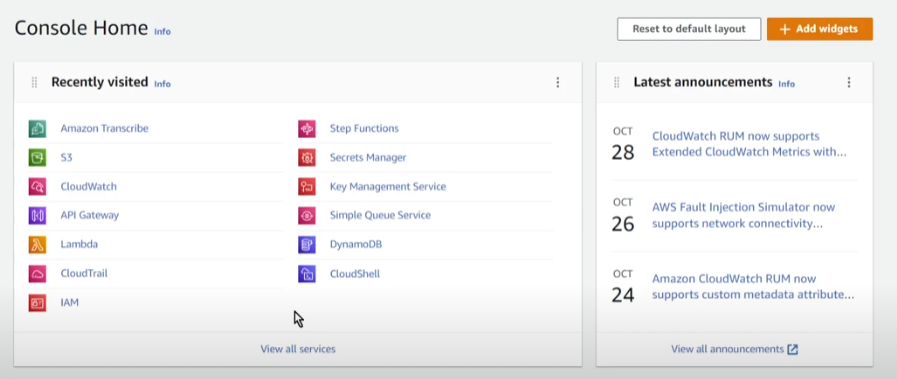
If you don’t see Amazon Transcribe under your recently visited services, you can simply type “Transcribe” into the search bar and select it.
On the left-hand side of the dashboard, you’ll find two primary options:
1. Real-Time Transcription – This feature allows you to transcribe speech as it’s being spoken. It’s great for scenarios where you’re at your computer with a microphone ready. You can start streaming your audio, and Amazon Transcribe will convert your speech into text in real-time. Once you’re done, you can easily download the full transcript.
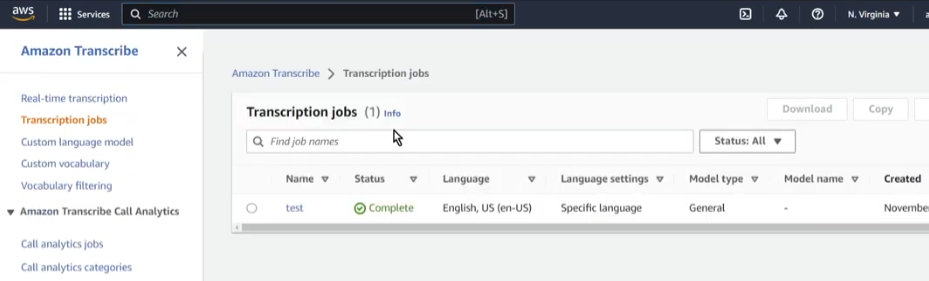
2. Transcription of Pre-Recorded Files – This feature is useful for converting existing audio or video files into text. Whether you have an audio-only file or a video from a platform like YouTube, Amazon Transcribe can handle both.
To perform real-time transcription using Amazon Transcribe, follow these steps to convert live audio into text as it’s spoken:
How to Use Real-Time Transcription in Amazon Transcribe
1. Navigate to Real-Time Transcription
2. Start Streaming Your Audio
Once you’re in the real-time transcription interface, click the Start Streaming button.
This will start recording any audio that’s being spoken into your microphone or fed from an external source.
As you speak, Amazon Transcribe will begin converting the audio into text and displaying the results on your screen in real time.

3. Adjust Real-Time Transcription Settings
You can fine-tune certain aspects of the transcription before you begin, such as the language being spoken.
Although Amazon Transcribe supports multiple languages, it’s best to specify the correct language for more accurate results.
If needed, enable speaker identification if multiple speakers are involved, which will label each speaker in the transcription.
4. View the Transcription
As you speak, you’ll see the text appear on the screen in near real-time.
The transcription will continuously update as long as the stream is active.
5. Stop Streaming
When you’re done with the live transcription, simply click Stop Streaming to end the session.
The transcription will be finalized, and you’ll have the option to download the text in various formats.
6. Download or Save the Transcript

After the transcription is complete, you can choose to download the text as a JSON file, or copy it directly from the interface to paste elsewhere.
This makes it easy to store or share the transcription for future use.
Advanced Features for Real-Time Transcription
1. Custom Vocabulary – For scenarios involving specific terminologies, you can upload custom vocabularies to improve accuracy. For instance, if you’re dealing with industry-specific terms or acronyms, custom vocabularies will help Amazon Transcribe recognize those terms correctly.
2. Speaker Identification – Amazon Transcribe’s real-time feature also allows for speaker identification. If there are multiple speakers, it can label them as “Speaker 1,” “Speaker 2,” etc., which is useful for meetings or interviews.
3. Punctuation and Capitalization – The service automatically adds punctuation and capitalizes where necessary, making the transcription more readable without manual adjustments.
Use Cases for Real-Time Transcription
1. Live Events and Webinars – Transcribe the audio from webinars or conferences in real-time to provide immediate notes or closed captions.
2. Meetings and Interviews – Capture what’s being said in a business meeting or an interview without taking notes, ensuring that no key details are missed.
3. Customer Service – Real-time transcription can be used in call centers to log customer interactions, improving the quality of service and assisting with training.
How to Transcribe a Pre-Recorded File
Now, let’s walk through the steps of transcribing a pre-recorded file:
1. Upload the File – Amazon Transcribe requires files to be stored in an S3 (Amazon Simple Storage Service) bucket. If you don’t have one yet, you’ll need to create a new bucket and upload your audio or video file. After uploading, copy the S3 URI (the file path) to use in the transcription job.
2. Create a Transcription Job – In the Transcribe dashboard, navigate to “Transcription Jobs” and click the “Create Job” button. You’ll be prompted to name your job—feel free to name it anything that helps you keep track, such as “Lecture Notes” or “Call Recording.”

3. Select Your Settings – You can specify the language used in your audio file or enable automatic language detection. If your file contains multiple languages, Amazon Transcribe can also detect and transcribe each language spoken.
4. Submit the Job – Once your file is uploaded and settings are configured, click “Create Job.” Amazon Transcribe will process the file and create a text transcript. The time this takes depends on the size of your file, but most jobs complete within a few minutes.
Advanced Features of Amazon Transcribe
Amazon Transcribe offers several advanced features that make it a powerful tool for complex transcription tasks:
1. Speaker Identification – If your audio file contains multiple speakers, Transcribe can identify them and label each speaker’s speech. This is particularly useful for interviews, meetings, or customer service calls where multiple participants are speaking.
2. Redaction of Personal Information – For industries where privacy is critical, such as healthcare or finance, Transcribe can automatically redact sensitive information like names, addresses, phone numbers, and social security numbers from the transcript.
3. Custom Vocabulary – If your transcription involves industry-specific jargon or acronyms (such as “IDE” for Integrated Development Environment), you can create a custom vocabulary to ensure these terms are recognized accurately.
4. Alternative Transcription Results – If there are multiple ways to transcribe a particular section of audio, Transcribe can provide alternative transcriptions for you to review.
Wrap-Up
Amazon Transcribe is a powerful tool for converting speech to text, whether in real-time or from pre-recorded files.
Its versatility, ease of use, and range of advanced features make it an ideal solution for many different applications, from business to education and beyond.
With just a few steps, you can transform your audio and video content into accurate, easy-to-read text that can be used for a variety of purposes.